Sunday, November 24, 2013

I couldn't wait

As promised, here's a couple photos of the garland over our door. It was a little hard to get a good shot because of the angle of our porch, but you get the idea. I'm planning to add a few more things, but this project required moderately decent weather, which I was worried we might not get again. 
I'm also  keeping an eye out for a Christmas flag to replace my owl one, but so far they're all cheesy. I might move the flag stand inside and hang a Santa banner on it that is quilted.
I'll have more updates after thanksgiving when I'm allowed to get out the tree. Until then, Stay warm!

Thursday, November 21, 2013

Holidays Are Near, and Quick Crockpot Stew

With snow on the ground this morning, and Thanksgiving only a week away, it IS beginning to look a lot like Christmas! My husband showed me this photo, which I couldn't resist sharing:

Those of you who know me well, know I'm the elf. I LOVE Christmas, and I'm especially excited this year to celebrate fully in our new place, without trying to locate the ornaments and decor in storage. We also have some lovely features in our new place that will provide for exciting new opportunities to decorate: we now have a front porch, a fireplace with mantel, and this nifty big window bay by the front door! I'm tackling the porch first, and you can see the self-control setting was not on when there was a 60% off sale at Michael's:
I bought THREE 6 foot garlands to decorate our front door, though to my credit I was only going to get 2 until Andy pointed out that it wouldn't be long enough. We got some twinkle lights to keep the garland company, and I'm trying to decide if it I could actually wait it out until after Thanksgiving to put them up. I promise, promise that there will be pictures once I get them up. There will also probably be instructions because, based on Andy's face in the aisle at Michael's when he asked how I was going to attach them, I'm guessing it won't be easy.

I also got cracking on another decor project last night with my mom. Remember the sweet wedding dress I made for my cousin's bridal shower?
Stay tuned this week for how I Christmas-fied that dress form for the holidays!

So that I don't leave you empty-handed, here's a recipe I tackled this week, with delicious success:

Carrot Sweet Potato and Chicken Stew
Toss this all in the crockpot before you head out the door, and come home to less than 5 minutes til dinner time!
*Find Thai chili paste in a small jar in the Asian food aisle, or try swapping 2 Tbs. chipotle in adobo or just plain salsa. This soup is flavorful, but not super spicy, so be brave!
**I used homemade stock, which was very flavorful. If you use the kind from a box or can (which I normally would), you may need a bit extra salt and pepper. Consider throwing in a bay leaf or some rosemary sprigs, too!

6 medium carrots, cut into bit size pieces (quick chop is fine)
1 sweet potato, peeled and cut into 1-inch pieces (trust me on peeling it-I'm usually lazy, but it was worth it for this)
1 medium onion, diced
4-5 boneless skinless chicken thighs
1 can coconut milk (Asian foods aisle)
2 cups chicken broth or stock**
2 Tbs. Thai Chili paste*
Salt and pepper (to taste)
Chopped cilantro and extra chili paste for serving (optional)

In the crockpot, place carrots, onions and sweet potatoes on bottom, then layer chicken to rest on top (this will make it easier to fish out to shred it later). Pour in broth and coconut milk, chili paste, and season chicken thighs with salt and pepper. Cook on low 6-8 hours, or high 4-5 hours.

Carefully remove chicken thighs to a plate and shred, set aside. Using a stick blender, blend soup remaining in crockpot until some chunks of carrot and sweet potato remain, or transfer half of soup to a blender, blend until smooth, then return and stir together. Return chicken to stew, stir, and serve with cilantro and extra chili paste. It will likely still be piping hot, but if needed, put the lid back on the crock and let it warm another 30 minutes.

Serves 6

Wishing you love and warmth during this cold day,
Kelli


Monday, November 11, 2013

Easy Weeknight Roasted Vegetables and Wild Rice

So I am now part of a modern family: both my hubby and I are working full-time 9-5 jobs. Getting dinner on the table every night is going to be harder than ever, and I'm ready to go to work on it!
Try this easy weeknight dinner to keep it fresh, delicious, and simple this fall.

Roasted Vegetables and Wild Rice
1 lb. carrots (about 5 medium), cut into 1 1/2 inch lengths (or baby carrots)
1 lb. cremini mushrooms, halved, or quartered if large
1/2 red onion, cut into bite size hunks
2 Tbs. olive oil
1 heaping tsp. dried thyme leaves
4 oz. fresh spinach
1 pkg. Uncle Ben's wild rice 90-second microwavable, or 1 1/2 cups cooked rice or quinoa
1/4 cup chopped pistachios
Juice of one lemon

Heat oven to 425. On two rimmed baking sheets, toss mushrooms, onions, and carrots with oil and thyme leaves. Roast 20 minutes, tossing once. Heat rice according to package directions. When roasted vegetables are tender, toss rice, veggies, spinach and lemon juice. Top with chopped pistachios. Serve immediately. Round out your dinner with steamed green beans. My hubby also noted this would be a nice side to a pork chop. Maybe next time!


Sunday, November 10, 2013

Birthday Feast

I'm way, way behind on blogging, but there's no time like the present to catch up. Last weekend, I had a milestone birthday, and since we finally had a home we could host a party in, we did! I know most people would want to be pampered on their birthday, and have everything done for them (ok, so did I), but I just knew that, although I had fantasies of being content with a dinner out at a crowded restaurant where I can't hear my friends, I wouldn't be able to resist cooking and having my loved ones in my home. Not to mention, nothing makes me much happier than cooking, so it was a great way to decompress after the wild and crazy last two months! On that note, here's what I was up to for the last two months: I moved, started a new job (which is great!), completed my first triathlon, and took my first case to trial. It was nuts! It was also magnificent! I'm feeling totally refreshed after emerging from that time of lunacy, and now I'm ready to settle in for the holidays.

So, my party. As I mentioned, we moved, and now we have a great space for entertaining, and I'm lucky enough to have wonderful friends who will drive an hour to see me! I am also SO lucky that my mama now lives 3 miles up the street from me and she can come help me get ready for things like this! There are lots of other perks to having my mama close, but this is one of them. She was the commander-in-chief on the cheesecake, and it was the belle of the ball. Thanks Mama!

I wanted to serve foods that were simple, seasonal, and unique. I always love combining foods that I already eat every day in ways that are unexpected. My menu for the party was designed to be mostly hands off in the time leading up to the arrival of my guests, making it easy to pick up and set out serving pieces in the last moments. Of course, the best laid plans...Let's just say, I underestimated how long it would take to let cheesecake cool, then to bake bread, etc. I may have had wet hair when my guests arrived, and I may have served dinner an hour later than expected. And you know what? It was just as delicious and enjoyable. I also had the opportunity to count my blessings when I spent the entire afternoon the next day washing dishes. I am blessed that I have more loved ones than I can count on both hands, and I served 11 of them dinner. Here's the recipes of my veritable feast, plus the timing (which I've adjusted so you won't have wet hair when your guests arrive!)
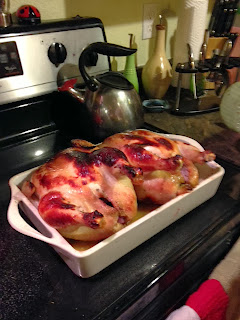
Cider Brined Roasted Whole Chickens
2 4-5 lb. Whole Chickens
3-4 quarts apple cider
1 cup salt
2 bay leaves
1 Tsp. whole pepper corns
1/2 cup sugar
2 lemons
2-4 Tbs. Olive oil
2 tsp. salt
1 tsp. fresh cracked black pepper

In a small saucepan, bring 2 cups of apple cider to a boil, then add 1 cup salt, sugar, bay leaves, and pepper corns, and cook until salt and sugar are dissolved (this is the brining liquid). Once dissolved, remove from heat and allow to steep/cool for about 10 minutes. Meanwhile, rinse chickens and place in a large stockpot (or any container big enough to hold both chickens plus enough liquid to cover). Pour remaining apple cider over chickens plus salted-cider mixture (brining liquid) to cover. Place in fridge for at least 2 hours, and up to 4 hours until ready to cook.

Heat oven to 350 degrees. In a 9 x 13 baking dish (with at least 2 inch sides), pour 2 Tbs. olive oil and spread to cover the bottom. Drain brining liquid, discarding liquid, peppercorns and bay leaves. Place chickens breast side down side-by-side in baking dish. Cut lemons in half, squeezing juice into chicken cavity, then place lemons inside the cavity. Take 1 tsp. salt, and rub inside and outside each chicken. Sprinkle pepper on outside of each chicken. Drizzle olive oil on outside of each chicken and rub to cover skin.

Roast chickens breast side down for 20 minutes, then remove from oven, rotate breast-side up, then return to oven for 30-40 minutes more, until temperature in thickest part of the thigh registers 165 degrees. Skin will be very dark golden. Allow chicken to cool 5 minutes, then carve and serve immediately.

Roasted Brussels Sprouts and Grapes
2 lbs. brussels sprouts, trimmed, and halved
2 lbs. red seedless grapes
2 tsp. dry thyme leaves
2 Tbs. olive oil
Salt and pepper

Heat oven to 350. Drizzle olive oil into the bottom of a 9 x 13 or larger baking dish or rimmed baking sheet. Place halved brussels cut side down in dish. Place grapes over top of brussels, then spinkle thyme leaves over top. Sprinkle with salt and pepper to taste (probably 1 tsp. each). Roast 15 minutes, then remove and stir, tossing brussels and grapes, then return to oven for 30-35 minutes, until grapes almost burst and brussels are well-caramelized. Serve hot!

Roasted Apples and Onions
4 Golden delicious apples, cored and quartered
1 large yellow onion, peeled and quartered
1 Tbs. olive oil
1/2 tsp. grated nutmeg

Heat oven to 350. Toss apples, onion, nutmeg, and olive oil in a 9 x 13 pan (if you're keeping track, I do in fact have more than three 9 x 13 pans). Roast for 35-40 minutes. Serve with chicken-also delicious with pork.

 
Honey Whole Wheat Bread
See the recipe from my previous blog post by clicking here. It was the coup de gras for the party, well worth the effort!

Pumpkin Cheesecake
I adapted this recipe that my aunt Barb gave me to have a gingersnap crust instead of graham cracker, and the results were swoon-worthy.
Crust
4 cups ginger snap cookies
1 cup melted butter

In a food processor, crush ginger snaps until fine crumbs form. Add melted butter, 2-3 Tbs. at a time, combining between additions, until crumbs resemble wet sand, and stick together when pressed. Firmly press mixture into the bottom of two spring form pans. Set aside.

Filling
1 1/2 cups sugar, divided
3 Tbs. flour
1 1/2 tsp. Pumpkin Pie Spice
2 8 oz. pkgs cream cheese, softened
1 cup canned pumpkin
1 1/2 tsp. vanilla extract
6 eggs, yolks and whites separated
1/8 tsp. salt
1/2 tsp. cream of tartar

Preheat oven to 275. Combine 1 cup sugar with flour and pumpkin pie spice. Add cream cheese, pumpkin and vanilla. Beat until smooth. In a separate bowl, beat egg yolks until light, then add to cheese mixture. In another bowl, beat egg whites, salt and cream of tartar. Gradually add remaining 1/2 cup sugar and beat until stiff. Fold gently into cheese mixture. Pour into prepared pans. Bake for 1 1/2 hours-until firm and no jiggle in center. Turn off oven, open door a crack, and allow to cool inside oven, at least 20 minutes. Chill at least 2 hours, then serve with whipped cream.

So, getting all this done in one day:
Don't do what I did. I did the cheesecake first, and letting it cool in the oven was eternal when I was trying to get bread baking in there. I would trade warm oven fresh bread for my sanity any day.
Start with the bread. The bread takes about 20 minutes to mix, 20 to rise, 20 more to rise after forming, and 20 to bake. Then the cheesecake takes about 2 1/2 hours all together, then about an hour for the roasting chickens and veggies. So, if you rewind from 6 o'clock dinner, that's starting around 1:00 p.m. And I started around 2:30. Don't do that. So, start with mixing the bread, and baking it. While it's rising the first time, make the brine for the chicken and get it into the fridge to marinate. Once you get the bread into the oven, mix the cheesecake. While the bread is cooling, pop the cheesecake into the oven. Now, prep your brussels and grapes, and quarter your onions. Do the apples right before oven time because they'll brown-no good. Once cheesecake is out of the oven, cooled, and into the fridge, you can work on putting the chicken together, and getting the brussels, apples, and chickens into the oven. then, unlike me, you'll have almost an hour to relax!

I have so much more to share, so keep an eye on my blog over the next weeks.

Wishing you a blessed fall,
Kelli


Thursday, July 25, 2013

Easy Pizza on the Grill

I have made some recipes that I've found online, in magazines, on Pinterest that flopped. I don't like to tell you about them because it's usually not as if they exploded, which would be funny; they were just ho-hum, or a crazy amount of work for something that wasn't that special. So, I admit, I had very low expections when I decided to try a recipe for pizza dough made with Greek yogurt and flour. I'm SO glad I tired it! It came out great, especially if you are a fan of a little thicker, chewier crust. I decided to be brave and tackle not only a new recipe, but a new cooking technique: pizza on the grill. This could have been like that time I decided to try and jump over all the steps to the diving board (and still have the scars on my shins 22 years later to show for it) but it was not a disaster at all! In fact, it was awesome! Oh, and did I mention I had homemade pizza in less than 25 minutes start to finish?

So here's what I did:

Pizza Dough:
Makes one pizza crust about 12 inches in diameter. I wasn't sure it looked like enough, so I doubled it and made a second pizza-we were so full we didn't even finish the first one. The dough is very hearty!
1 cup Greek yogurt (Plain, and I used non-fat) I think you could also use plain traditional yogurt
1 cup flour, plus extra for kneading
1 Tbs. baking powder
1 Tbs. baking soda
Pinch salt

Stir together all ingredients until dough starts to come together and is slightly sticky. Turn out on a floured surface, and have lots of extra flour handy to add in. I added about an extra 1/2 cup altogether. Knead the dough until no longer sticky (tacky is ok). This took maybe 3 minutes, and again, adding extra flour a tablespoon at a time. That's it. No rising, no waiting!

Form pizza dough to desired thickness. I did this by hand, starting by patting it out into a 9 inch disk, then pulling it to get it to about 12 inches. Mine was really oblong and rustic; if you wanted a round pizza, you could probably employ a rolling pin, or pat it into a pizza pan. You can now top the pizza and bake it, or go to Grilling instructions. The recipe I used didn't include baking instructions, but I would go with 400 for 10-15 minutes and see if it looks like pizza yet. Also, the dough is quite moist, so I'd add sauce with caution so you don't get soggy pizza. Maybe a good thick marina, but not a straight up can of tomatoes, which I may have learned the hard way.

To Grill Pizza:
Preheat grill to medium high. Prep your toppings. I did sliced grilled chicken, sliced roma tomatoes (one per pizza), and about 4 oz. of sliced fresh mozzarella, but feel free to go wild! I think Canadian bacon and pinapple would be awesome! Spray one side of the patted out crust with cooking oil spray. Using your hands, place the dough on the grill, oiled side down (over lit burners), being careful to keep it flat-it's hard to adjust once it's on the grill since the dough is soft at first. Close the lid, and grill about 3-5 minutes. The top will begin to puff, and the bottom will get grill marks and brown,and crisp up. Using tongs, check for golden brown bottom. If not yet crisp and golden on the bottom, grill a few minutes more. Once crisp and golden on the bottom, use the tongs (or a large flat metal spatula might work better) to carefully flip the crust. Now you can add toppings, and potentially sauce, and cheese. Once your toppings are in place, close the lid and grill about 7-10 minutes until bottom is crisp and golden and cheese is melted. Remove to a cookie sheet or large platter, and top with fresh torn basil. Enjoy!

The crust is nice and crisp on the outside, and delightfully chewy once you bite in. I think this dough would work great to make naan or flatbread to go along with Indian food too! It has a nice little tang to it, almost like sourdough, but it doesn't overwhelm the pizza. I will definitely be making this my go-to pizza dough.

In other news, my triathlon training is going great! Today I ran 19 total minutes! This is a huge leap for me, especially since one month ago I could only run for 3.5 minutes at a time! I'm amazed that July is almost over, but I'm also not sad that the hot weather is almost over, too, so I can potentially run or bike at some time other than at dawn. It was a little creepy running this morning with no one around. It was one of those moments when you wonder if you missed the rapture :)

Wednesday, July 10, 2013

Asian BBQ Chicken and Snap Pea and Red Cabbage Slaw

 
As soon as we got back from our vacation, I was ready to cook! A solid week of eating out most meals left me restless, so I plowed into the July issue of Bon Appetit for some fresh ideas to get us out of our burger rut. Andy actually said, "I only want to eat fish and chicken" after our week choc full of red meat.
To my delight, the feature of the July issue is "Grilling Chicken!" I adapted this recipe for the kabobs on the cover, mostly because I was too lazy to cut up the chicken into hunks and too hungry to wait for the bamboo skewers to soak for an hour. The result was fantastic-I can't imagine it being better on the kabobs, and this was way less work.
 
Sambal Chicken Skewers
Ingredients
  • 1/2 cup (packed) light brown sugar
  • 1/2 cup apple cider vinegar
  • 1/3 cup hot chili paste or hot sauce
  • 1/4 cup fish sauce
  • 1/4 cup Sriracha
  • 2 teaspoon finely grated peeled ginger (or dried grated ginger)
  • 1 1/2 pounds skinless, boneless chicken thighs, cut into 1 1/2-inch–2-inch pieces (or not, in my case)

Special equipment

  • 8 bamboo skewers soaked in water at least 1 hour (again, I skipped this and grilled them whole)
  • Ingredient info

    Hot chili paste and fish sauce is available at Asian markets, and in many supermarkets near other Asian foods, usually next to soy sauce on a top shelf. Fish sauce is potent, so buy a small bottle at first as you use very little.

Preparation

  • Prepare grill for medium-high heat. Whisk brown sugar, vinegar, chili paste, fish sauce, Sriracha, and ginger in a large bowl. NOTE: it stinks, but trust me it turns out fine. Add chicken and toss to coat. Let marinate 5-10 minutes.  Thread 4 or 5 chicken pieces onto each skewer, and move chicken to a plate until you are ready to grill, and reserve marinade.
  • Transfer marinade to a small saucepan. Bring to a boil, reduce heat, and simmer until reduced by half (about 1 cup), 7–10 minutes. NOTE: this also stinks, so crack a window.
  • Grill chicken, turning and basting often with reduced marinade, until cooked through, 8–10 minutes.
 
I served this sticky, sweet & spicy chicken with a fresh and easy slaw of sliced sugar snap peas and red cabbage:

Ingredients

  • 3 tablespoons extra-virgin olive oil
  • 3 tablespoons fresh lemon juice
  • 1 teaspoon honey
  • Kosher salt, freshly ground pepper
  • 1/4 small red cabbage, thinly sliced
  • 8 ounces sugar snap peas, thinly sliced crosswise
  • 1/4 cup chopped fresh flat-leaf parsley
  • 1/4cup chopped fresh mint or basil (I did mint and it was sublime!)

Preparation

  • Whisk oil, lemon juice, and honey in a large bowl; season with salt and pepper. Add cabbage, snap peas, parsley, and mint and toss to combine.
  • DO AHEAD: Vegetables can be cut and dressing can be made 8 hours ahead. Cover and chill separately. Toss vegetables and dressing together just before serving.


This blog post was brought to you in part my cat Marcelle, who helped me by sitting on my keyboard. She says, "You're welcome." Actually, she said, "r:eeeeeeeeeeeeeeeeeeeeeeeeee........................"

Tuesday, July 9, 2013

An easy DIY Wedding Gift

As I mentioned yesterday, I recently attended my cousin's wedding. It was so beautifully decorated and every detail was thoughtfully planned. I suspect this is what weddings in the "Pinterest era" will be like for a while. My friend got married last November, and it was equally elaborate, with fun details, great ways to make and preserve memories, and details that really spoke to the bride and groom.
As a Pinterest osbsessionista, I was bound to make at least part of my cousin's wedding gift by hand. A few weeks before her wedding, I stumbled onto this idea: http://www.shanty-2-chic.com/2013/05/free-printable.html
That's a free printable that says: "In our Home let love abide, and Bless all those who step inside"
I just thought that was the perfect phrase to have up in your new home as husband and wife, so I got to work. The idea on the website was to frame it in a handmade frame. When I saw the power tools involved, I decided to take an alternate route.
So, here's what I did:
Went to Hobby Lobby and got an unfinished wooden plaque, upolstry tacks, a set of sawtooth picture hangers, and one sheet of white cardstock. Total cost: $7.47 (though I have 44 tacks left, and 2 extra hangers)
Here's what I started with:
Sorry-forgot to take a photo with the hanger that goes on the back, but I'll show you that below.
Let me share my first lesson learned with this project: don't start the day before you need it. I used a special process for staining the unfinished wood where you use vinegar and steel wool. It's easy, and the result was beautiful, but you have to let the vinegar and steel wool soak in a glass jar for 24 hours, which I discovered exactly 24 hours before I needed this project to be done. I had looked at lots of tutorials online to use this steel wool and vinegar technique (too late of course) and theirs all looked pretty brown and muddy after the 24 hours. Mine looked like white vinegar with a glob of steel wool floating in it after 23 hours, so I started to panic. I read one idea where the person had used tea to also stain before using the steel wool, so I made a batch of tea. And prayed. The praying must have worked, as you'll see below.
After I rounded everything else up, I got to work on printing the printable (see website above for your very own). My printer has been misbehaving lately, so printing ONE sheet took about 20 minutes, but it came out perfect! The printed image looks like a chalkboard, which is a sweet effect. So while that was working (or hardly working), I made the tea and started frantically staining the wood with tea. This is what it looked like after 2 coats. So, basically, like I had done nothing.

 
I decided to take my chances with the steel wool even though it looked pretty useless. You can kind of see it in the background below here floating in the mason jar. Lesson number 2: To my total shock, as I rubbed the steel wool directly onto the wood, it stained it! It is a lovely grayish brown that looks aged, rather than simply finished. So, even if the vinegar doesn't turn dark, the steel wool will still stain. This was the first coat:


Lesson number 3: As you can see, I stained the concrete below. Oops! I suppose mostly because I didn't think it was going to work, I neither put down newspaper nor put on gloves:

I would highly recommend both. Fortunately, I was able to cover my nasty stained fingernails with a nice coat of coral nail polish. This was after a second and final coat:

Of note, the stain stinks like vinegar, but I didn't find it unbearable. I worked outside, and since this was a small project (my little plaque was 8 x 10) it only took moments to put on each coat, and each coat dried almost instantly. Next, I attached the picture hanger to the back (sorry for the blurry picture):
Then, I cut down the printed image. Lesson number 4: I did what you should never do: I didn't measure the plaque before I printed the phrase, so I had to mash it down and make it work. If I'd measured, I would have realized the surface was actually 7.5 x 9.5 and I'd have to trim a bit. To attach the photo, I measured a half inch in from the top and side of each corner, then placed an upolstry tack and pressed it as far as I could by hand. I placed all the tacks, checked to see that it looked right, then hammered them gently the rest of the way in.


Here's the finished product:

And, next to the front door (i.e., out of the blaring midday sun)

 
And Lesson number 5: Wait a few days and let the vinegar air out before gifting. You could smell the vinegar through the wrapping paper! Oh, well.
 
Altogether, not including the wait time to "cure" the steel wool in the vinegar, this project took less than an hour, including waiting between coats. I would highly recommend you also check out this post from the same blogger which has additional similar ideas: http://www.shanty-2-chic.com/2013/04/mothers-day-gift-free-printable.html