Friday, December 13, 2013

Last few little bits of Christmas glitz

As promised, I had a few more projects up my sleeve for fitting my home for the holidays.
 Here's the final touches:
My mom got this huge mirror from my grandma a few years ago, and it just didn't find a home in my parents' house. I mentioned that I was struggling to find the right decor for my mantel, and my mom and I thought this mirror just might work. I think it's fabulous! The garland of knitted trees was a bargain at Target, and I crocheted a single chain with some ivory sparkly yarn to string the mini-wreaths to finish it off. I ended up adding a couple under-used scarves which I forgot to take photos of. As we get Christmas cards, we're stringing them along the mantle hung from yarn with clothespins. It's pretty cute!

This is the doll I made into a little bride for my cousin's shower earlier this year. I found some fun fabric scraps in my mom's bins and Christmas-fied her! Everything's held on with pins so I can disassemble and make it new again!

Finally, this super project doesn't grace the walls at my house, but I helped my mom make this for her office at work. It came out spectacular! My mom was inspired by something similar on Pinterest, but I love our version even more! We started with a black canvas from Hobby Lobby, and added layers of chalk drawings, tissue pom-pons, garlands of flags that we stenciled NOEL onto, and a few ornaments. I LOVE it! 

Wednesday, December 4, 2013

Christmas Decorating nearly complete

I wanted to share some photos of my Christmas decorations, and hopefully warm your spirit on this blustery cold day! I am calling the front porch done, though I initially had other plans to bling it up a little more. The inside still has boxes everywhere (of not yet placed Christmas decor), so I'll have a few more pictures soon once I get everything arranged.

Enjoy!
This is the view from the porch. I just love the rug you can see through the door that says "Owl be Home for Christmas!" 


I made this tree by flipping a tomato cage upside down and wrapping lights around it and setting it on a now-fallow planter. I added a blingy garland of gold stars so it doesn't look quite so sad during the day when the lights are off. It really makes the porch feel complete.

The tree, and as noted, the boxes. I used to have two trees and I haven't figured out quite what to do with all the extra ornaments.

I was the most excited about decorating this window. It's just inside the front door, and is over 4 feet tall and a couple feet deep, so I had lots of opportunity. I like that it's a mix special handmade decorations (the snowman near the middle was made by my Grandma) and purchased finds. Our Christmas Cactus is about to bloom, so I left it in the middle. I also whipped up the lighted wreath last year using doilies. You wrap a string of lights around a wire wreath form, then cut small slits in the center of small paper doilies and poke the lights through. It was NOT as easy as it looked, but the effect is worth it. 

Sunday, November 24, 2013

I couldn't wait

As promised, here's a couple photos of the garland over our door. It was a little hard to get a good shot because of the angle of our porch, but you get the idea. I'm planning to add a few more things, but this project required moderately decent weather, which I was worried we might not get again. 
I'm also  keeping an eye out for a Christmas flag to replace my owl one, but so far they're all cheesy. I might move the flag stand inside and hang a Santa banner on it that is quilted.
I'll have more updates after thanksgiving when I'm allowed to get out the tree. Until then, Stay warm!

Thursday, November 21, 2013

Holidays Are Near, and Quick Crockpot Stew

With snow on the ground this morning, and Thanksgiving only a week away, it IS beginning to look a lot like Christmas! My husband showed me this photo, which I couldn't resist sharing:

Those of you who know me well, know I'm the elf. I LOVE Christmas, and I'm especially excited this year to celebrate fully in our new place, without trying to locate the ornaments and decor in storage. We also have some lovely features in our new place that will provide for exciting new opportunities to decorate: we now have a front porch, a fireplace with mantel, and this nifty big window bay by the front door! I'm tackling the porch first, and you can see the self-control setting was not on when there was a 60% off sale at Michael's:
I bought THREE 6 foot garlands to decorate our front door, though to my credit I was only going to get 2 until Andy pointed out that it wouldn't be long enough. We got some twinkle lights to keep the garland company, and I'm trying to decide if it I could actually wait it out until after Thanksgiving to put them up. I promise, promise that there will be pictures once I get them up. There will also probably be instructions because, based on Andy's face in the aisle at Michael's when he asked how I was going to attach them, I'm guessing it won't be easy.

I also got cracking on another decor project last night with my mom. Remember the sweet wedding dress I made for my cousin's bridal shower?
Stay tuned this week for how I Christmas-fied that dress form for the holidays!

So that I don't leave you empty-handed, here's a recipe I tackled this week, with delicious success:

Carrot Sweet Potato and Chicken Stew
Toss this all in the crockpot before you head out the door, and come home to less than 5 minutes til dinner time!
*Find Thai chili paste in a small jar in the Asian food aisle, or try swapping 2 Tbs. chipotle in adobo or just plain salsa. This soup is flavorful, but not super spicy, so be brave!
**I used homemade stock, which was very flavorful. If you use the kind from a box or can (which I normally would), you may need a bit extra salt and pepper. Consider throwing in a bay leaf or some rosemary sprigs, too!

6 medium carrots, cut into bit size pieces (quick chop is fine)
1 sweet potato, peeled and cut into 1-inch pieces (trust me on peeling it-I'm usually lazy, but it was worth it for this)
1 medium onion, diced
4-5 boneless skinless chicken thighs
1 can coconut milk (Asian foods aisle)
2 cups chicken broth or stock**
2 Tbs. Thai Chili paste*
Salt and pepper (to taste)
Chopped cilantro and extra chili paste for serving (optional)

In the crockpot, place carrots, onions and sweet potatoes on bottom, then layer chicken to rest on top (this will make it easier to fish out to shred it later). Pour in broth and coconut milk, chili paste, and season chicken thighs with salt and pepper. Cook on low 6-8 hours, or high 4-5 hours.

Carefully remove chicken thighs to a plate and shred, set aside. Using a stick blender, blend soup remaining in crockpot until some chunks of carrot and sweet potato remain, or transfer half of soup to a blender, blend until smooth, then return and stir together. Return chicken to stew, stir, and serve with cilantro and extra chili paste. It will likely still be piping hot, but if needed, put the lid back on the crock and let it warm another 30 minutes.

Serves 6

Wishing you love and warmth during this cold day,
Kelli


Monday, November 11, 2013

Easy Weeknight Roasted Vegetables and Wild Rice

So I am now part of a modern family: both my hubby and I are working full-time 9-5 jobs. Getting dinner on the table every night is going to be harder than ever, and I'm ready to go to work on it!
Try this easy weeknight dinner to keep it fresh, delicious, and simple this fall.

Roasted Vegetables and Wild Rice
1 lb. carrots (about 5 medium), cut into 1 1/2 inch lengths (or baby carrots)
1 lb. cremini mushrooms, halved, or quartered if large
1/2 red onion, cut into bite size hunks
2 Tbs. olive oil
1 heaping tsp. dried thyme leaves
4 oz. fresh spinach
1 pkg. Uncle Ben's wild rice 90-second microwavable, or 1 1/2 cups cooked rice or quinoa
1/4 cup chopped pistachios
Juice of one lemon

Heat oven to 425. On two rimmed baking sheets, toss mushrooms, onions, and carrots with oil and thyme leaves. Roast 20 minutes, tossing once. Heat rice according to package directions. When roasted vegetables are tender, toss rice, veggies, spinach and lemon juice. Top with chopped pistachios. Serve immediately. Round out your dinner with steamed green beans. My hubby also noted this would be a nice side to a pork chop. Maybe next time!


Sunday, November 10, 2013

Birthday Feast

I'm way, way behind on blogging, but there's no time like the present to catch up. Last weekend, I had a milestone birthday, and since we finally had a home we could host a party in, we did! I know most people would want to be pampered on their birthday, and have everything done for them (ok, so did I), but I just knew that, although I had fantasies of being content with a dinner out at a crowded restaurant where I can't hear my friends, I wouldn't be able to resist cooking and having my loved ones in my home. Not to mention, nothing makes me much happier than cooking, so it was a great way to decompress after the wild and crazy last two months! On that note, here's what I was up to for the last two months: I moved, started a new job (which is great!), completed my first triathlon, and took my first case to trial. It was nuts! It was also magnificent! I'm feeling totally refreshed after emerging from that time of lunacy, and now I'm ready to settle in for the holidays.

So, my party. As I mentioned, we moved, and now we have a great space for entertaining, and I'm lucky enough to have wonderful friends who will drive an hour to see me! I am also SO lucky that my mama now lives 3 miles up the street from me and she can come help me get ready for things like this! There are lots of other perks to having my mama close, but this is one of them. She was the commander-in-chief on the cheesecake, and it was the belle of the ball. Thanks Mama!

I wanted to serve foods that were simple, seasonal, and unique. I always love combining foods that I already eat every day in ways that are unexpected. My menu for the party was designed to be mostly hands off in the time leading up to the arrival of my guests, making it easy to pick up and set out serving pieces in the last moments. Of course, the best laid plans...Let's just say, I underestimated how long it would take to let cheesecake cool, then to bake bread, etc. I may have had wet hair when my guests arrived, and I may have served dinner an hour later than expected. And you know what? It was just as delicious and enjoyable. I also had the opportunity to count my blessings when I spent the entire afternoon the next day washing dishes. I am blessed that I have more loved ones than I can count on both hands, and I served 11 of them dinner. Here's the recipes of my veritable feast, plus the timing (which I've adjusted so you won't have wet hair when your guests arrive!)

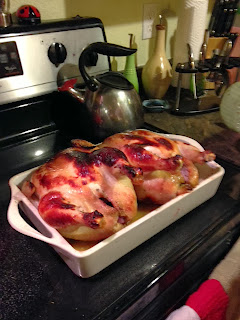
Cider Brined Roasted Whole Chickens
2 4-5 lb. Whole Chickens
3-4 quarts apple cider
1 cup salt
2 bay leaves
1 Tsp. whole pepper corns
1/2 cup sugar
2 lemons
2-4 Tbs. Olive oil
2 tsp. salt
1 tsp. fresh cracked black pepper

In a small saucepan, bring 2 cups of apple cider to a boil, then add 1 cup salt, sugar, bay leaves, and pepper corns, and cook until salt and sugar are dissolved (this is the brining liquid). Once dissolved, remove from heat and allow to steep/cool for about 10 minutes. Meanwhile, rinse chickens and place in a large stockpot (or any container big enough to hold both chickens plus enough liquid to cover). Pour remaining apple cider over chickens plus salted-cider mixture (brining liquid) to cover. Place in fridge for at least 2 hours, and up to 4 hours until ready to cook.

Heat oven to 350 degrees. In a 9 x 13 baking dish (with at least 2 inch sides), pour 2 Tbs. olive oil and spread to cover the bottom. Drain brining liquid, discarding liquid, peppercorns and bay leaves. Place chickens breast side down side-by-side in baking dish. Cut lemons in half, squeezing juice into chicken cavity, then place lemons inside the cavity. Take 1 tsp. salt, and rub inside and outside each chicken. Sprinkle pepper on outside of each chicken. Drizzle olive oil on outside of each chicken and rub to cover skin.

Roast chickens breast side down for 20 minutes, then remove from oven, rotate breast-side up, then return to oven for 30-40 minutes more, until temperature in thickest part of the thigh registers 165 degrees. Skin will be very dark golden. Allow chicken to cool 5 minutes, then carve and serve immediately.

Roasted Brussels Sprouts and Grapes
2 lbs. brussels sprouts, trimmed, and halved
2 lbs. red seedless grapes
2 tsp. dry thyme leaves
2 Tbs. olive oil
Salt and pepper

Heat oven to 350. Drizzle olive oil into the bottom of a 9 x 13 or larger baking dish or rimmed baking sheet. Place halved brussels cut side down in dish. Place grapes over top of brussels, then spinkle thyme leaves over top. Sprinkle with salt and pepper to taste (probably 1 tsp. each). Roast 15 minutes, then remove and stir, tossing brussels and grapes, then return to oven for 30-35 minutes, until grapes almost burst and brussels are well-caramelized. Serve hot!

Roasted Apples and Onions
4 Golden delicious apples, cored and quartered
1 large yellow onion, peeled and quartered
1 Tbs. olive oil
1/2 tsp. grated nutmeg

Heat oven to 350. Toss apples, onion, nutmeg, and olive oil in a 9 x 13 pan (if you're keeping track, I do in fact have more than three 9 x 13 pans). Roast for 35-40 minutes. Serve with chicken-also delicious with pork.

 
Honey Whole Wheat Bread
See the recipe from my previous blog post by clicking here. It was the coup de gras for the party, well worth the effort!

Pumpkin Cheesecake
I adapted this recipe that my aunt Barb gave me to have a gingersnap crust instead of graham cracker, and the results were swoon-worthy.
Crust
4 cups ginger snap cookies
1 cup melted butter

In a food processor, crush ginger snaps until fine crumbs form. Add melted butter, 2-3 Tbs. at a time, combining between additions, until crumbs resemble wet sand, and stick together when pressed. Firmly press mixture into the bottom of two spring form pans. Set aside.

Filling
1 1/2 cups sugar, divided
3 Tbs. flour
1 1/2 tsp. Pumpkin Pie Spice
2 8 oz. pkgs cream cheese, softened
1 cup canned pumpkin
1 1/2 tsp. vanilla extract
6 eggs, yolks and whites separated
1/8 tsp. salt
1/2 tsp. cream of tartar

Preheat oven to 275. Combine 1 cup sugar with flour and pumpkin pie spice. Add cream cheese, pumpkin and vanilla. Beat until smooth. In a separate bowl, beat egg yolks until light, then add to cheese mixture. In another bowl, beat egg whites, salt and cream of tartar. Gradually add remaining 1/2 cup sugar and beat until stiff. Fold gently into cheese mixture. Pour into prepared pans. Bake for 1 1/2 hours-until firm and no jiggle in center. Turn off oven, open door a crack, and allow to cool inside oven, at least 20 minutes. Chill at least 2 hours, then serve with whipped cream.

So, getting all this done in one day:
Don't do what I did. I did the cheesecake first, and letting it cool in the oven was eternal when I was trying to get bread baking in there. I would trade warm oven fresh bread for my sanity any day.
Start with the bread. The bread takes about 20 minutes to mix, 20 to rise, 20 more to rise after forming, and 20 to bake. Then the cheesecake takes about 2 1/2 hours all together, then about an hour for the roasting chickens and veggies. So, if you rewind from 6 o'clock dinner, that's starting around 1:00 p.m. And I started around 2:30. Don't do that. So, start with mixing the bread, and baking it. While it's rising the first time, make the brine for the chicken and get it into the fridge to marinate. Once you get the bread into the oven, mix the cheesecake. While the bread is cooling, pop the cheesecake into the oven. Now, prep your brussels and grapes, and quarter your onions. Do the apples right before oven time because they'll brown-no good. Once cheesecake is out of the oven, cooled, and into the fridge, you can work on putting the chicken together, and getting the brussels, apples, and chickens into the oven. then, unlike me, you'll have almost an hour to relax!

I have so much more to share, so keep an eye on my blog over the next weeks.

Wishing you a blessed fall,
Kelli


Thursday, July 25, 2013

Easy Pizza on the Grill

I have made some recipes that I've found online, in magazines, on Pinterest that flopped. I don't like to tell you about them because it's usually not as if they exploded, which would be funny; they were just ho-hum, or a crazy amount of work for something that wasn't that special. So, I admit, I had very low expections when I decided to try a recipe for pizza dough made with Greek yogurt and flour. I'm SO glad I tired it! It came out great, especially if you are a fan of a little thicker, chewier crust. I decided to be brave and tackle not only a new recipe, but a new cooking technique: pizza on the grill. This could have been like that time I decided to try and jump over all the steps to the diving board (and still have the scars on my shins 22 years later to show for it) but it was not a disaster at all! In fact, it was awesome! Oh, and did I mention I had homemade pizza in less than 25 minutes start to finish?

So here's what I did:

Pizza Dough:
Makes one pizza crust about 12 inches in diameter. I wasn't sure it looked like enough, so I doubled it and made a second pizza-we were so full we didn't even finish the first one. The dough is very hearty!
1 cup Greek yogurt (Plain, and I used non-fat) I think you could also use plain traditional yogurt
1 cup flour, plus extra for kneading
1 Tbs. baking powder
1 Tbs. baking soda
Pinch salt

Stir together all ingredients until dough starts to come together and is slightly sticky. Turn out on a floured surface, and have lots of extra flour handy to add in. I added about an extra 1/2 cup altogether. Knead the dough until no longer sticky (tacky is ok). This took maybe 3 minutes, and again, adding extra flour a tablespoon at a time. That's it. No rising, no waiting!

Form pizza dough to desired thickness. I did this by hand, starting by patting it out into a 9 inch disk, then pulling it to get it to about 12 inches. Mine was really oblong and rustic; if you wanted a round pizza, you could probably employ a rolling pin, or pat it into a pizza pan. You can now top the pizza and bake it, or go to Grilling instructions. The recipe I used didn't include baking instructions, but I would go with 400 for 10-15 minutes and see if it looks like pizza yet. Also, the dough is quite moist, so I'd add sauce with caution so you don't get soggy pizza. Maybe a good thick marina, but not a straight up can of tomatoes, which I may have learned the hard way.

To Grill Pizza:
Preheat grill to medium high. Prep your toppings. I did sliced grilled chicken, sliced roma tomatoes (one per pizza), and about 4 oz. of sliced fresh mozzarella, but feel free to go wild! I think Canadian bacon and pinapple would be awesome! Spray one side of the patted out crust with cooking oil spray. Using your hands, place the dough on the grill, oiled side down (over lit burners), being careful to keep it flat-it's hard to adjust once it's on the grill since the dough is soft at first. Close the lid, and grill about 3-5 minutes. The top will begin to puff, and the bottom will get grill marks and brown,and crisp up. Using tongs, check for golden brown bottom. If not yet crisp and golden on the bottom, grill a few minutes more. Once crisp and golden on the bottom, use the tongs (or a large flat metal spatula might work better) to carefully flip the crust. Now you can add toppings, and potentially sauce, and cheese. Once your toppings are in place, close the lid and grill about 7-10 minutes until bottom is crisp and golden and cheese is melted. Remove to a cookie sheet or large platter, and top with fresh torn basil. Enjoy!

The crust is nice and crisp on the outside, and delightfully chewy once you bite in. I think this dough would work great to make naan or flatbread to go along with Indian food too! It has a nice little tang to it, almost like sourdough, but it doesn't overwhelm the pizza. I will definitely be making this my go-to pizza dough.

In other news, my triathlon training is going great! Today I ran 19 total minutes! This is a huge leap for me, especially since one month ago I could only run for 3.5 minutes at a time! I'm amazed that July is almost over, but I'm also not sad that the hot weather is almost over, too, so I can potentially run or bike at some time other than at dawn. It was a little creepy running this morning with no one around. It was one of those moments when you wonder if you missed the rapture :)

Wednesday, July 10, 2013

Asian BBQ Chicken and Snap Pea and Red Cabbage Slaw

 
As soon as we got back from our vacation, I was ready to cook! A solid week of eating out most meals left me restless, so I plowed into the July issue of Bon Appetit for some fresh ideas to get us out of our burger rut. Andy actually said, "I only want to eat fish and chicken" after our week choc full of red meat.
To my delight, the feature of the July issue is "Grilling Chicken!" I adapted this recipe for the kabobs on the cover, mostly because I was too lazy to cut up the chicken into hunks and too hungry to wait for the bamboo skewers to soak for an hour. The result was fantastic-I can't imagine it being better on the kabobs, and this was way less work.
 
Sambal Chicken Skewers
Ingredients
  • 1/2 cup (packed) light brown sugar
  • 1/2 cup apple cider vinegar
  • 1/3 cup hot chili paste or hot sauce
  • 1/4 cup fish sauce
  • 1/4 cup Sriracha
  • 2 teaspoon finely grated peeled ginger (or dried grated ginger)
  • 1 1/2 pounds skinless, boneless chicken thighs, cut into 1 1/2-inch–2-inch pieces (or not, in my case)

Special equipment

  • 8 bamboo skewers soaked in water at least 1 hour (again, I skipped this and grilled them whole)
  • Ingredient info

    Hot chili paste and fish sauce is available at Asian markets, and in many supermarkets near other Asian foods, usually next to soy sauce on a top shelf. Fish sauce is potent, so buy a small bottle at first as you use very little.

Preparation

  • Prepare grill for medium-high heat. Whisk brown sugar, vinegar, chili paste, fish sauce, Sriracha, and ginger in a large bowl. NOTE: it stinks, but trust me it turns out fine. Add chicken and toss to coat. Let marinate 5-10 minutes.  Thread 4 or 5 chicken pieces onto each skewer, and move chicken to a plate until you are ready to grill, and reserve marinade.
  • Transfer marinade to a small saucepan. Bring to a boil, reduce heat, and simmer until reduced by half (about 1 cup), 7–10 minutes. NOTE: this also stinks, so crack a window.
  • Grill chicken, turning and basting often with reduced marinade, until cooked through, 8–10 minutes.
 
I served this sticky, sweet & spicy chicken with a fresh and easy slaw of sliced sugar snap peas and red cabbage:

Ingredients

  • 3 tablespoons extra-virgin olive oil
  • 3 tablespoons fresh lemon juice
  • 1 teaspoon honey
  • Kosher salt, freshly ground pepper
  • 1/4 small red cabbage, thinly sliced
  • 8 ounces sugar snap peas, thinly sliced crosswise
  • 1/4 cup chopped fresh flat-leaf parsley
  • 1/4cup chopped fresh mint or basil (I did mint and it was sublime!)

Preparation

  • Whisk oil, lemon juice, and honey in a large bowl; season with salt and pepper. Add cabbage, snap peas, parsley, and mint and toss to combine.
  • DO AHEAD: Vegetables can be cut and dressing can be made 8 hours ahead. Cover and chill separately. Toss vegetables and dressing together just before serving.


This blog post was brought to you in part my cat Marcelle, who helped me by sitting on my keyboard. She says, "You're welcome." Actually, she said, "r:eeeeeeeeeeeeeeeeeeeeeeeeee........................"

Tuesday, July 9, 2013

An easy DIY Wedding Gift

As I mentioned yesterday, I recently attended my cousin's wedding. It was so beautifully decorated and every detail was thoughtfully planned. I suspect this is what weddings in the "Pinterest era" will be like for a while. My friend got married last November, and it was equally elaborate, with fun details, great ways to make and preserve memories, and details that really spoke to the bride and groom.
As a Pinterest osbsessionista, I was bound to make at least part of my cousin's wedding gift by hand. A few weeks before her wedding, I stumbled onto this idea: http://www.shanty-2-chic.com/2013/05/free-printable.html
That's a free printable that says: "In our Home let love abide, and Bless all those who step inside"
I just thought that was the perfect phrase to have up in your new home as husband and wife, so I got to work. The idea on the website was to frame it in a handmade frame. When I saw the power tools involved, I decided to take an alternate route.
So, here's what I did:
Went to Hobby Lobby and got an unfinished wooden plaque, upolstry tacks, a set of sawtooth picture hangers, and one sheet of white cardstock. Total cost: $7.47 (though I have 44 tacks left, and 2 extra hangers)
Here's what I started with:
Sorry-forgot to take a photo with the hanger that goes on the back, but I'll show you that below.
Let me share my first lesson learned with this project: don't start the day before you need it. I used a special process for staining the unfinished wood where you use vinegar and steel wool. It's easy, and the result was beautiful, but you have to let the vinegar and steel wool soak in a glass jar for 24 hours, which I discovered exactly 24 hours before I needed this project to be done. I had looked at lots of tutorials online to use this steel wool and vinegar technique (too late of course) and theirs all looked pretty brown and muddy after the 24 hours. Mine looked like white vinegar with a glob of steel wool floating in it after 23 hours, so I started to panic. I read one idea where the person had used tea to also stain before using the steel wool, so I made a batch of tea. And prayed. The praying must have worked, as you'll see below.
After I rounded everything else up, I got to work on printing the printable (see website above for your very own). My printer has been misbehaving lately, so printing ONE sheet took about 20 minutes, but it came out perfect! The printed image looks like a chalkboard, which is a sweet effect. So while that was working (or hardly working), I made the tea and started frantically staining the wood with tea. This is what it looked like after 2 coats. So, basically, like I had done nothing.

 
I decided to take my chances with the steel wool even though it looked pretty useless. You can kind of see it in the background below here floating in the mason jar. Lesson number 2: To my total shock, as I rubbed the steel wool directly onto the wood, it stained it! It is a lovely grayish brown that looks aged, rather than simply finished. So, even if the vinegar doesn't turn dark, the steel wool will still stain. This was the first coat:


Lesson number 3: As you can see, I stained the concrete below. Oops! I suppose mostly because I didn't think it was going to work, I neither put down newspaper nor put on gloves:

I would highly recommend both. Fortunately, I was able to cover my nasty stained fingernails with a nice coat of coral nail polish. This was after a second and final coat:

Of note, the stain stinks like vinegar, but I didn't find it unbearable. I worked outside, and since this was a small project (my little plaque was 8 x 10) it only took moments to put on each coat, and each coat dried almost instantly. Next, I attached the picture hanger to the back (sorry for the blurry picture):
Then, I cut down the printed image. Lesson number 4: I did what you should never do: I didn't measure the plaque before I printed the phrase, so I had to mash it down and make it work. If I'd measured, I would have realized the surface was actually 7.5 x 9.5 and I'd have to trim a bit. To attach the photo, I measured a half inch in from the top and side of each corner, then placed an upolstry tack and pressed it as far as I could by hand. I placed all the tacks, checked to see that it looked right, then hammered them gently the rest of the way in.


Here's the finished product:

And, next to the front door (i.e., out of the blaring midday sun)

 
And Lesson number 5: Wait a few days and let the vinegar air out before gifting. You could smell the vinegar through the wrapping paper! Oh, well.
 
Altogether, not including the wait time to "cure" the steel wool in the vinegar, this project took less than an hour, including waiting between coats. I would highly recommend you also check out this post from the same blogger which has additional similar ideas: http://www.shanty-2-chic.com/2013/04/mothers-day-gift-free-printable.html


Monday, July 8, 2013

In the swing of summer

It’s summer! I’ve been keeping busy with the usual summer activities: June weddings, summer travel, Independence Day BBQs, and the like. I also decided to devote my summer to training for a triathlon! It sounded crazy when my dear friend suggested we do it together a few weeks ago, but I’ve come to really enjoy the process. That doesn’t quite describe it: I loathe the actual running, I ache all the time, and in places I didn’t know existed, but what is so enjoyable is that despite that, I don’t want to quit.  Even though I feel like garbage while running, I have run more in the last 3 weeks than I’ve ever run in my life. I got on a bicycle for the first time in 9 years, overcoming my near-catatonic fear of crashing again. The other rewarding part is that the swimming part of my training program is so easy for me that I double it. I LOVE the days where I get to swim. Today, I started ramping up to doing two parts in one day, which I’ll do a few times a week at this point. I ran for 25 minutes this morning, then swam for 20 minutes. I was so bushed after doing both that while I was blow-drying my hair, I had to take breaks because my arms were so tired! I’d take a nap, but I finally got my hair all pretty after all that J I view this level of exhaustion, too, as a sign I should keep going and get in shape! Some other benefits of this training regimen are the stellar tan I’m acquiring being outside, and the fact that I ate like every day last week was the 4th of July, and didn’t gain any weight! The triathlon is September 22, so please keep me in your thoughts as I train.

Andy and I also got to enjoy a little R & R last week on our Great American Midwest Vacation. We went to Nebraska City for my cousin’s wedding, then trekked up to the land of 10,000 lakes to visit family, celebrate Andy’s dad’s “50th” Birthday, and catch up with some of our old Minnesota friends. On the way back, we got to swing by the lake to spend Independence Day with my Bricker clan for a bit before finally getting home. We were so tired when we got back on July 4th, we decided to just watch the fireworks on PBS!

I have so much more to tell you about, but I’m going to do several posts on the projects and plates I’ve been cooking up, so plan to see more from me this week.

Tuesday, June 18, 2013

Father's Day Menu: Jucy Lucy Burgers and Ice Cream Cake

 
You may have noticed that this past Sunday was Father's Day. My dad is not a foodie like me. My dad would probably eat cardboard if I sprinkled cheese on it, and the worst complaint I'd probably get is "it would be ok if you didn't make that again." Bottom line: my dad will eat anything. However, every once in a blue moon, my dad surprises me by really liking something we eat. A few years back, by parents came to visit us in Minnesota, and we went out for Jucy Lucys. There a few places in the Twin Cities that claim to have invented the Jucy Lucy, a special burger that has the yummy melted cheese inside the patty. You can read more about it by clicking here. Well, on a whim I decided to take my parents to one of these establishments, the 5-8 Club. I told my dad about the folklore that both the 5-8 Club and Matt's Bar claim to have invented this burger. We ate Jucy Lucys, Dad loved it, and then declared that we would have to go to Matt's Bar the next night to test out their version. So we did! Dad preferred the version at Matt's Bar (a dive by any definition) and we returned when my family was next in town. So, when I scratched my head as to what we should make to eat for Father's Day, I had an epiphany. I had seen an episode of Cook's Country where they made Jucy Lucys from scratch. We did that this weekend, and they came out great! My dad was quite pleased. The recipe for Jucy Lucys that I followed is at the end of this post.
So, do you think I took any pictures of these monster burgers before we ate them all? Of course not. So you'll just have to drool looking at the pictures of the ice cream cake we made! It was a huge hit! My mom is always my sous chef on these little adventures and she was quite inspiring when we did this:

 
Not the best pictures I realize, but this was after we ravaged the cake.
I have made this once before, but we took it to a whole new level this time! My mom had the genius idea to get ice cream with the candy bars in it rather than chop them up. Trust me when I say this is so easy! You simply layer ice cream sandwiches and softened ice cream! So here's more or less what I did:
 
Ice Cream Cake:
1 box square or rectangular ice cream sandwiches (you could really get creative here, but we went with vanilla filled with the traditional chocolate cookie. We actually found a 16-pack of mini-sandwiches that were the perfect size for the pan!)
1 quart (actually a pint would probably suffice) of ice cream of your choice, slightly softened. Our was plenty soft by the time we got home from the grocery store because we had a special, extra-chatty checkout experience. We got a Snickers ice cream because my dad's favorite candy bar is Snickers. The last time I made it I chopped up the candy bars (I think I did Twix). This was WAY easier. Again, you could go to town with any flavor ice cream.
1 12-oz. container of Cool Whip, thawed 
1/2 cup hot fudge, plus additional for serving
1/2 cup caramel sauce for serving
 
Line a loaf pan (the one we used was about 4" x 8") with foil-this makes it easier to get out later. Line up ice cream sandwiches end to end in the bottom, squishing to fit if needed. We used mini-sandwiches, which were about 1.5" x 4" and we got 6 in there. Spread softened ice cream so that you have about an inch of ice cream (probably a cup, but I obviously didn't measure it out.) Then, if your hot fudge is really thick, pop it in the microwave for a few seconds, then spread about 1/2 cup of hot fudge in the loaf pan. Add another layer of ice cream sandwiches, and a final layer of ice cream until you reach the top of the pan. Freeze in loaf pan for 2-3 hours until fairly firm. Remove from freezer and if needed allow to thaw slightly to enable you to get it out of the pan. Invert the loaf pan on a platter or other freezer-safe dish. Remove foil gently. "Frost" the cake with Cool Whip, using a spatula to smooth. You'll use most of the 12 oz. container, making a thick layer of frosting. Return cake to the freezer for at least 2 hours, or over night. Remove about 5 minutes before serving, then cut into 1" slices and serve with extra hot fudge and caramel. Makes about 6-8 slices.


Jucy Lucy Burgers (from Cook's Country by America's Test Kitchen)
Prep time: 60 minutes
Cook time: 10-15 minutes
Total time: 1 hour 15 minutes
Yield: 4 servings


WHY THIS RECIPE WORKS: Minneapolis taverns are famous for serving a sandwich called the Jucy Lucy, a moist beef burger stuffed with American cheese. Replicating the Jucy Lucy recipe seemed easy enough—simply seal a slice of American cheese between two beef patties and throw it on the grill. But our burgers, cooked to well-done to melt the cheese inside, were dry and tough. Or worse, the cheese melted through the meat, leaving an empty cavern where the cheese had been. We wanted to figure out how to keep the Lucy juicy and hold the cheese inside. To keep the cheesy center of our recipe in place, we created a double-sealed pocket by wrapping a chunk of cheese inside a small beef patty and then molding a second patty around the first. Grilling the burgers over medium heat fully cooked the burgers and melted the cheese inside. Adding a panade—a mixture of bread and milk mashed into a paste—to the ground beef kept the burgers moist and juicy.

** Straight from the grill, the cheesy center of the Jucy Lucy will be molten hot. Be sure to let the burgers rest for at least 5 minutes before serving. **

INGREDIENTS


§     2 slices hearty white sandwich bread, torn into rough pieces

§     1/4 cup milk

§     1 teaspoon garlic powder

§     3/4 teaspoon salt

§     1/2 teaspoon pepper

§     1 1/2 pounds 85 percent lean ground beef

§     4 slices deli American cheese, each slice folded into quarters

INSTRUCTIONS

1. Using potato masher, mash bread, milk, garlic powder, salt, and pepper in large bowl until smooth. Add beef and gently knead until well combined.

2. Divide meat mixture into 4 equal portions. Divide each portion into 2 equal portions. Mold  1 portion of meat around 1 piece of cheese, then mold the second around the mini-patty with the cheese. Transfer patties to plate and refrigerate for 30 minutes or up to 24 hours.

3. Grill burgers over medium fire until well browned and cooked through, 6 to 8 minutes per side. Transfer to plate, tent with foil, and let rest 5 minutes. Serve.

STOVETOP JUCY LUCY BURGERS

Prepare Grilled Jucy Lucy Burgers through step 2. Heat 2 teaspoons vegetable oil in large nonstick skillet over medium heat until just smoking. Add patties and cook until well browned, about 6 minutes. Flip burgers, cover skillet, and continue cooking until well-done, about 6 minutes. Transfer to plate, tent with foil, and let rest 5 minutes. Serve.

FORM A JUCY LUCY

To avoid a burger blowout, it’s essential to completely seal in the cheese. Don’t worry about overworking the meat-adding milk and bread to the ground beef ensures tender, juicy burgers every time.


Now one of these days I'll come up with some clever catch phrase like Paula Deen has ("Love and Best Dishes!") but until then,
All my love,
Kelli

Wednesday, June 12, 2013

Pretzels and Popsicles!

It has been another lively week here in beautiful Colorado. We've had record high temperatures, and since it was finally deemed hot enough to need the air conditioning, I was permitted to turn it on. For those of you who know me well, I would have had it running full blast since the first time it cracked 75, but reasonable minds differ. I was looking forward to it all morning on Monday, and I turned it on, it pumped (unenthusiastically) cool air...for about 3 minutes. Then, it became clear something was wrong. By 8:00 pm, it was 87 degrees in the kitchen. Gross. We ate BLTs and the 10 minutes of standing over the bacon was misery. Fortunately, our landlord repaired it quickly the next day, and now I can carry on heating up the kitchen with good eats! Today, I tackled an unlikely recipe. I purchased yeast in one of those 3 pack strips, and noticed a recipe on the back for Bran Pretzels. I had recently had some wheat bran donated to me by someone who decided to go gluten-free (may I never be so unlucky). I was just convinced enough by the fact that the recipe claimed to have won a prize for "good fibes" (evidently a fiber-rich recipe contest) to go ahead and try it. Guess what? They are pretty good! I believe pretty much everything would be improved with a cheese dipping sauce, but even plain they were tasty!

Here's the recipe, with my commentary, of course.

Bran Pretzels

1 1/2 c. warm water (100-110 degrees)
1 envelope of dry yeast
1 1/2 c. wheat bran
1 1/4-1 3/4 c. all-purpose flour
1 Tbs. sugar
1 tsp. salt
3/4 c. whole wheat flour
1 egg beaten (add about 1 Tbs. water to make easier to apply)
coarse salt, to taste (I used maybe 1/2 Tbs. total)

Place water in a large bowl, add yeast and stir until dissolved. Add bran  to yeast (stir a bit) and let stand 10 minutes.
Add 1 cup of all purpose flour, sugar, and salt. Beat 2 minutes at medium speed with an electric mixer* (see note below), scraping bowl occasionally. Stir in whole wheat flour, and add all-purpose flour 1/4 cup at a time until a soft dough forms. I added about 1/2 cup, and then added a bit more as I was kneading. Knead on lightly floured surface until dough is smooth and elastic, about 8-10 minutes. Place in greased bowl, turning to grease top. Cover; let rise in warm, draft-free place until doubled in size, about 45 minutes.
Punch dough down; turn out onto lightly floured surface. Divide dough into 12 equal pieces. Roll each piece into a 13-inch rope, shape into pretzels. Place on greased baking sheet. Brush lightly with beaten egg; sprinkle with coarse salt, as desired.
Preheat oven to 425 degrees. Bake 15-20 minutes (mine were 18) or until browning on tops. Remove from sheet and cool on a wire rack.
*Notes: I will say that the beating for 2 minutes will seem excessive. Everything is totally incorporated after a few seconds. It will look like this:
Here's why you have to do it (and why you have to knead it well, too.) When you work with whole grains, like whole-wheat flour, wheat bran, rye flour, etc., they do not develop gluten the same way that more processed all-purpose flour does. That is, you must develop the gluten more by working the dough, by beating and kneading it. Gluten is the protein strands that make breads rise-think about the difference between a airy angel food cake and a dense rye bread. If you don't work the dough enough, the bread or cake will be tough and dense instead of light and chewy like traditional breads and cakes. It is worth effort to get those whole grains in there because they are good for you (so you can eat more, right?) Just bear in mind that it is a little more labor-intensive than when you work with white flours. I learned that on PBS ladies and gentlemen.
Also of note, gluten has gotten a bad rap of late because many people are experimenting with going gluten-free and they feel great. I'm highly skeptical of this because almost everyone I know who has done it ate total junk before, and now that they can't eat most bread or flour (bye-bye McDonalds and Taco Bell) or anything with gluten in it (i.e., tons of processed foods that have gluten added to thicken them), they feel great because they don't eat garbage anymore. That said, I know people who have celiac disease or have been diagnosed with a gluten intolerance, too. I'm not knocking it if your doctor told you not to eat wheat, I'm just saying that I'm not giving up bread, and permitting a blanket demonizing of gluten, just because someone feels better not eating McDonalds anymore. That's my rant on gluten-free. I'll get off my soapbox now.
I also made something truly spectacular this week, and now I'm addicted to it. A few summers back, I found a recipe for Melon Sherbet, which was mostly cantaloupe and buttermilk combined to make ice cream. It's sublime. The other day, I was reading the best issue of Bon Appetit ever, and I saw a recipe for a strawberry lassi, which you can see here. A lassi is essentially a smoothie. I decided to mash together the best of both worlds by substituting melon for the strawberries. Then I took it up a notch by pouring this concoction into Popsicle molds. The smoothie is divine by itself, but the Popsicles are a nice light treat to satisfy the sweet tooth. I used watermelon because I couldn't find cantaloupe this week, but I am positive that cantaloupe would be as good, or a combo of melons would be tasty, too.
So, here's the recipe: 
Purée 1 1/2 cups halved hulled strawberries (or cubed watermelon to follow my lead), 2/3 cup ice, 1/2 cup buttermilk, 1/3 cup unsweetened coconut milk, and 1 tablespoon sugar in a blender until smooth and frothy.
Makes 2 large smoothies, or pour into Popsicle molds and freeze until set. My molds make 8 small pops (I got the molds for $1.50 at Walmart), and there was about 3/4 c. of smoothie left.
If you have trouble finding coconut milk (check by the Asian foods section) try substituting almond milk or soy milk, or just regular milk.

Read More http://www.bonappetit.com/recipes/2013/06/strawberry-coconut-lassi#ixzz2W2kv88S2

I hope this finds you enjoying the heck out of the first bites of summer.

Monday, June 3, 2013

Waste not: A pumpkin love story

For those of you who know me, there is no wrong season for pumpkin. There is no occasion for which pumpkin is not an appropriate ingredient. Nonetheless, I usually get all fired up with everyone else around the early fall for the return of all things pumpkin. Today, it is the third day of June. Appropriate time to blog about pumpkin recipes? Yes.
I have a really awesome recipe for Pumpkin Pie Oatmeal Parfaits (I could have sworn I'd shared that recipe on here before, but alas no. You'll have to wait for another day.) The downside is that even though I make a double batch, it still leaves about a cup of leftover pumpkin puree from a 15 oz. can. Not enough to use in the average recipe that calls for pumpkin, yet far too much for all those recipes that call for 3 Tbs. (seriously, who has only 3 Tbs. of pumpkin just lying around?) So, what to do with 1 cup of pumpkin puree (in June)? I found a great resource on this website for small amounts of pumpkin (1/2 cup or less) and decided to venture making a double batch of one, and I had just enough left to make one more recipe! I decided to try Pumpkin Biscotti because I've never made biscotti, but have always wanted to try. Plus, it looked easy if a bit time consuming. My house smells amazing right now! I'm also going to whip up Pumpkin Hummus (see recipe below) this afternoon after I clean up the mountain of dishes left over from dinner last night (busted-my mother would be so horrified that I shared this) and the pumpkin biscotti adventure. That reminds me, I should really post about the dinner I made last night. It is a seriously decked out chicken sandwich that I love so much I've made it four times in the past month. Next time.

Pumpkin Biscotti:
Makes 10-12 cookies.
Ingredients

·         1 large egg

·         ½ cup sugar

·         ½ teaspoon baking powder

·         ¼ cup pumpkin puree

·         ½ teaspoon cinnamon

·         ¼ teaspoon freshly grated nutmeg

·         pinch of ginger

·         pinch of cloves

·         ⅛ teaspoon salt

·         ½ teaspoon vanilla

·         1¼ cups flour

·         3 tablespoons pepitas, lightly toasted (Pepitas are shelled roasted pumpkin seeds, which I did not have. I was NOT going to the store for this, so I subbed a handful of sunflower seeds and a handful of Craisins)

·         4 ounces real white chocolate, chopped

Instructions

1.     Preheat the oven to 350 and line a baking sheet with parchment paper or a silicone mat.

2.     In a medium bowl, beat together with a whisk the egg, sugar and baking powder. Beat vigorously until the mixture turns pale yellow and falls back in ribbons on itself when you lift out the whisk.

3.     Next, add the pumpkin puree, cinnamon, nutmeg, ginger, cloves, salt and vanilla. Continue whisking, aerating the mixture.

4.     Finally, sprinkle the flour on top and fold it in with a spatula. Fold in the pepitas last.

5.     Shape the dough into a flat log about 3″ wide by 8″ long using wet fingertips (the wet fingertips are important because the dough is very sticky). Bake for 40 minutes, or until a toothpick inserted comes out clean.

6.     Remove from the oven, turn the oven down to 300 and let rest for 15 minutes. Slice into ½” slices, place them back on the baking sheet, sliced side down, and bake another 30 minutes, flipping them half-way through.

7.     Let cool completely on a wire rack. When ready to serve, melt the white chocolate in a double boiler or in the microwave. Dip half of each biscotti into the white chocolate and let set before serving.

Notes (from original baker)

When making biscotti, the order of ingredients is important: be sure to beat the egg, sugar and baking powder alone before moving on to the next step.

Spicy Pumpkin Hummus:
Makes about 2 ½ cups of hummus

Ingredients:
1 can chickpeas, rinsed and drained
3 garlic cloves, minced
3 tablespoons lemon juice
2 tablespoons water
3 tablespoons tahini (I subbed 2 Tbs. sesame seeds and 1 Tbs. sesame oil)
1/2 cup canned pure pumpkin (not pumpkin pie filling)
1 teaspoon cumin
3/4 teaspoon salt
1/4 teaspoon cayenne pepper or to taste
3 tablespoons olive oil

Directions:
Place chickpeas, garlic cloves, lemon juice, water, and tahini in a food processor and blend until smooth. Add pumpkin and seasonings and blend until well incorporated. With the motor running, drizzle in olive oil until blended.

Taste, and adjust any seasonings to your taste (I added a bit more lemon juice, salt, and cayenne).
 
I hope you enjoy (even if you logically decide to wait until September) and that this finds you all well!
Kelli